The Goods and Services Tax (GST) is a comprehensive, multi-stage, destination-based tax that has replaced many indirect taxes in India. For small businesses, registering for a GST account is not only a legal requirement but also crucial for maintaining compliance and ensuring smooth business operations. This guide will walk you through the entire process of creating a GST account for your small business in India, from understanding the basics of GST to completing the registration process.
Table of Contents
Why GST Registration is Important for Small Businesses
GST registration is mandatory for businesses with an annual turnover exceeding ₹20 lakh (₹10 lakh for special category states). However, even if your business turnover is below this threshold, voluntary registration offers several benefits:
- Legal Compliance: Avoid penalties and ensure your business operates within the legal framework.
- Input Tax Credit: Claim the credit for the GST paid on your purchases, reducing the overall tax burden.
- Expansion Opportunities: Registered businesses can easily expand their operations across states without the need for multiple registrations.
Understanding GST and Its Components
Before diving into the registration process, it’s essential to understand the different components of GST:
- CGST: Central Goods and Services Tax, collected by the central government.
- SGST: State Goods and Services Tax, collected by the state government.
- IGST: Integrated Goods and Services Tax, applicable on inter-state transactions.
Eligibility for GST Registration
To register for GST, your business must meet certain criteria:
- Turnover Threshold: Businesses with an annual turnover exceeding ₹20 lakh (₹10 lakh for special category states) must register for GST.
- Inter-State Supply: Businesses engaged in inter-state supply of goods and services need to register, regardless of turnover.
- E-Commerce Operators: Businesses selling goods or services online through e-commerce platforms must register for GST.
- Casual Taxable Persons: Temporary businesses that operate for a limited period in any state must register.
- Non-Resident Taxable Persons: Non-resident businesses supplying goods or services in India need to register.
Documents Required for GST Registration
Before you start the registration process, ensure you have the following documents ready:
- PAN Card of the Business: The Permanent Account Number (PAN) of the business or proprietor (in the case of sole proprietorship) is mandatory.
- Proof of Business Registration or Incorporation Certificate: For companies, LLPs, and other registered entities.
- Identity and Address Proof: Aadhaar card, passport, driving license, or voter ID of the business owner or partners.
- Bank Account Details: Bank statement or canceled cheque with the account holder’s name, account number, IFSC code, and branch details.
- Address Proof of the Business Place: Rent agreement, electricity bill, or property tax receipt of the business premises.
- Photographs: Passport-sized photographs of the business owner or authorized signatories.
- Digital Signature Certificate (DSC): Required for companies and LLPs.
Step-by-Step Guide to Creating a GST Account
Step 1: Visit the GST Portal
Begin the registration process by visiting the official GST portal at https://www.gst.gov.in/. This portal is the central hub for all GST-related activities, including registration, filing returns, and tracking payments.
Step 2: Click on ‘New Registration’
On the GST portal homepage, you’ll find the ‘Services’ tab. Hover over it and click on ‘Registration’ from the dropdown menu. Then select ‘New Registration’ to initiate the process.
Step 3: Fill in the Basic Details
You will be redirected to a new page where you’ll need to fill in the following details:
- I am a: Select the type of taxpayer, such as a business owner, casual taxable person, or non-resident taxpayer.
- State/UT: Choose the state or union territory where your business is located.
- Legal Name of the Business: Enter the name of your business as per the PAN records.
- PAN: Enter your business or personal PAN (for sole proprietors).
- Email Address and Mobile Number: Provide a valid email address and mobile number, which will be used for OTP verification and future communications.
After filling in these details, click on ‘Proceed’.
Step 4: Verification of OTP
You will receive two OTPs—one on your registered mobile number and the other on your email. Enter both OTPs on the portal and click on ‘Proceed’ to verify.
Step 5: Generate Temporary Reference Number (TRN)
Upon successful verification, you will be issued a Temporary Reference Number (TRN). This TRN will be used to complete the remaining steps of the registration process. Note down the TRN for future reference.
Step 6: Complete the Registration Process
Using the TRN, log back into the GST portal. Click on ‘Complete Registration’ and enter the TRN number along with the captcha code. Click on ‘Proceed’ to continue.
Step 7: Fill in the Detailed Application Form
The registration form is divided into several sections. Ensure you complete each section carefully:
- Business Details: Provide the legal name, trade name (if any), PAN, and the date of commencement of the business. Also, specify whether you are opting for the Composition Scheme (available for small businesses with turnover up to ₹1.5 crore).
- Promoter/Partners Information: Enter the personal details, contact information, and identity proof of all promoters/partners.
- Authorized Signatory: Designate an authorized signatory who will be responsible for filing GST returns and other compliance-related activities.
- Principal Place of Business: Provide the complete address of your primary business location, along with proof of address.
- Additional Places of Business: If your business operates from multiple locations, provide details of each additional place.
- Goods and Services Details: Specify the nature of goods or services your business deals in. You can use the HSN (Harmonized System of Nomenclature) code for goods and SAC (Service Accounting Code) for services.
- Bank Account Details: Provide the bank account details where GST refunds, if any, will be credited.
- Verification: Verify the application using either a Digital Signature Certificate (DSC) or an Electronic Verification Code (EVC), which will be sent to your registered mobile number.
Step 8: Submission and ARN Generation
Once you’ve completed the form, review all the details carefully. After verification, submit the application. You will receive an Application Reference Number (ARN) on your registered mobile number and email. The ARN is a unique identifier for your GST application.
Step 9: GST Officer Verification
Your application will be reviewed by a GST officer. The officer may approve your application directly, or they might ask for additional information or documents. If additional details are required, you will receive a notification via email.
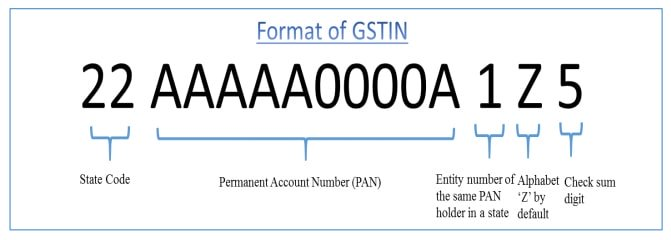
Step 10: GSTIN Allocation
Once your application is approved, you will be issued a GST Identification Number (GSTIN). The GSTIN is a 15-digit unique identification number that serves as your business’s identity under the GST regime.
Post-Registration Compliance
After receiving your GSTIN, you must comply with several post-registration requirements to avoid penalties and maintain your GST registration status.
1. Displaying GSTIN
Your GSTIN must be prominently displayed at your place of business and on all your invoices. This not only helps in maintaining transparency but also instills confidence in your customers.
2. Filing GST Returns
You are required to file GST returns periodically. The frequency of filing depends on the nature of your business and the GST scheme you’ve opted for:
- GSTR-1: Monthly return for outward supplies of goods and services.
- GSTR-3B: Monthly summary return for sales, purchases, and tax liability.
- GSTR-9: Annual return for a comprehensive summary of your business activities under GST.
3. Maintaining Proper Records
As a GST-registered business, you are required to maintain proper records of all your transactions, including sales, purchases, input tax credit, and output tax liability. These records should be preserved for a minimum of six years and be readily available for inspection by tax authorities.
4. Payment of GST
Ensure that you make timely GST payments to avoid interest and penalties. Payments can be made through the GST portal using various modes like net banking, debit card, or e-wallets.
5. Adhering to E-Way Bill Requirements
For businesses involved in the transportation of goods, generating an E-Way Bill is mandatory for the movement of goods worth more than ₹50,000. The E-Way Bill can be generated online and must accompany the goods during transit.
Common Mistakes to Avoid During GST Registration
- Incorrect PAN Details: Ensure that the PAN entered during registration matches the business or individual PAN records.
- Inadequate Documentation: Make sure all the required documents are available and correctly uploaded to avoid delays in the approval process.
- Choosing the Wrong Registration Type: Select the correct type of registration based on your business structure and turnover.
- Ignoring Email and Mobile Number Verification: Ensure that the email and mobile number provided are active and accessible, as all communications from GST authorities will be sent to these.
Conclusion
Creating a GST account for your small business in India is a crucial step toward ensuring legal compliance and leveraging the benefits of the GST regime. While the registration process may seem daunting at first, following the detailed steps outlined in this guide will make it much easier.
Once you’ve successfully registered, it’s essential to stay compliant by filing timely GST returns, maintaining accurate records, and adhering to all GST-related regulations. This not only helps in avoiding penalties but also allows you to take full advantage of input tax credits and other benefits provided under the GST system.
Remember that GST compliance is an ongoing responsibility. Regularly updating your business details on the GST portal, staying informed about any changes in GST rules, and ensuring that your business activities are in line with the GST law will go a long way in maintaining your business’s good standing.
By following the steps provided in this guide, small businesses in India can navigate the complexities of GST registration with confidence and ease. The process, though meticulous, ultimately empowers your business by integrating it into the formal economy, enhancing credibility, and opening up new opportunities for growth and expansion.
For further assistance or any queries related to GST registration, consider consulting with a tax professional or visiting the official GST portal, where you can find detailed resources and support for your GST-related needs.
By thoroughly understanding and completing the GST registration process, your small business will be well-positioned to thrive in India’s evolving tax landscape. Whether you’re a new entrepreneur or an established business owner, adhering to GST regulations is crucial for long-term success and stability in today’s competitive market.
For more content: Finance related, Applications related, Websites related.